

Two Cuts to Magic!
- Krista Moser

- Mar 2
- 3 min read
Updated: Mar 5

Here is a great way to use those charm packs that seem to sit around waiting for the perfect project. This quilt is so simple and quick, it’s perfect for a last-minute gift or a first-time quilter.

I have a growing collection of charm packs (5” squares). They're often given to me by fabric companies when their new lines come out. They are always fun to look at, but then I have to figure out what to do with them! Haha!


This week, I worked up a simple baby quilt using the disappearing nine-patch block. It turned out so stinking cute, I thought I'd share the process. These charm packs usually have 42 different 5” squares. For this baby quilt, I needed 45 squares. I found a complimenting fabric in my stash to get the remaining three squares I needed. I separated the stack into like colors and chose the black and yellow ones to be my “pop” colors. You’ll need 9 pop squares, one for each block.

I chose this bold ½” stripe as my alternate fabric. I cut five 5” wide x WOF strips then sub-cut those strips into (36) 5” squares.


Here is the basic block layout. One pop color square for the center with four companion squares at the corners. I placed the striped squares in the blank spots. I changed the direction of the stripe from vertical in the top and bottom rows to horizontal in the middle row.


Sew these together into three rows, and press the seams away from the striped fabric in each row. This will allow for nesting seams when the rows get sewn to each other. Sew the rows to each other and press those seams open. These blocks should measure 14” square at this stage.

Here is cut Number One! Take a long straight ruler and cut the block in half, as shown. The middle block should measure 4½” square at this stage. If you align the 2¼” line on the ruler with the seam to the left, the edge of the ruler should be right about dead center.

Now for cut Number Two! Turn the block a quarter turn or use one of those rotating mats to swivel the whole block around and cut it in half the other way.


You should have the block in four quarters, as shown here. I arranged the striped alternating blocks the way I did to create little frames around the corners. I love stripes and think it makes this block so interesting. Swivel the top right quadrant and the bottom left quadrant around, until the pop color is facing the outside edges. Sew the block back together and press the seams open.

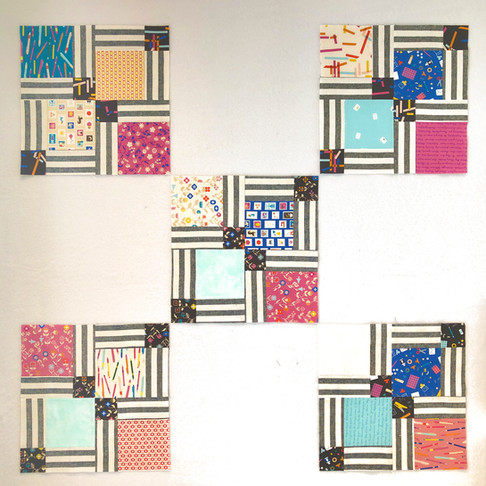


I did five blocks like this with the black “pop” squares. Then filled them in with the four blocks I made with the yellow pop squares. Sew these together into rows, then sew the rows to each other. This quilt measures 39 ½” square, perfect for a baby quilt or a wheelchair lap quilt!

I had just enough of the stripe to do the binding, so all together I made this quilt with one charm pack + 3 more squares, and one yard of the striped fabric! Plus, it was a great afternoon project!
Happy Sunday everyone,
Krista

P.S. I'm asked all the time where I find my cute striped fabric. The truth is, I watch for it… all the fabric companies send out Lookbooks and stripes are the only thing that catches my eye. For a while now, I've wanted to do a “stripe store” to offer the stripes I like to use, to everyone else, in one place! If you have been looking for some good stripes to use for your quilts, check out the fabulous stripes I’ve collected in my brand-new Stripe Store!! (Shipping is charged per 1/2 yd of fabric, but we will upgrade your status to Priority Mail and refund the difference. You can read more about our Shipping rates here.)
Follow all my quilty adventures on Instagram, Facebook, and Pinterest. Visit my YouTube channel for free tutorials and tips. If you like my patterns, you can buy them on Etsy, and here on the website.


