A super quick project just in time for the Fourth of July! And, you can test the waters doing a prairie point border on a project that is less intimidating than a quilt!
You will need (4) red 2.5” strips and (3) white 2.5” strips. You will also need (14) 5” dark blue squares and (14) 5” light blue squares
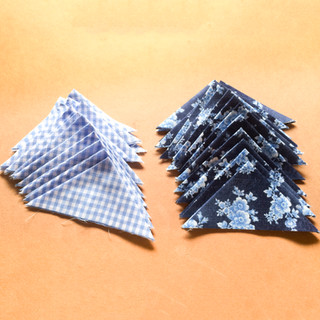
To make the prairie points, take the 5” squares to the ironing board. Press them in half like a napkin fold, then in half again so all the raw edges end up on one side.

Sew your strips together red, white, red, white… Press them out flat, flat, flat! Use steam if necessary (I’m a big fan of steam, ha!) Trim the ends even to whatever length you like.
Starting in the corner along the long edge, place a dark blue prairie point with its “opening” facing to the right. Lift the prairie point open, and nestle the light blue prairie point in between the layers with its “opening” facing to the right. (I spaced them out with about 1” overlap, but this will be adjusted to fit once you have them all placed). Repeat the nestling process with each prairie point alternating light and dark blue.
Once you have them all initially placed along the edge, you can slide them closer in to each other or space them out a little more to make the corners come out just right (the corners don’t overlap, they line up closely side by side).
Now, pin everything in place. You will want to pin on both ends of the prairie points so none of the flaps peel back during stitching. Stitch all the way around the table runner with a ¼” stay stitch.
Lay the table runner right side up on a piece of batting cut just larger than the runner. Cut a piece of backing fabric to the same size as the top and place it facing down onto the runner. Pin all three layers together, and stitch all the way around with a ⅜” seam allowance so it more than covers the quarter inch stay stitch from before. Leave about a 3” hole on one edge, backstitch on either side of the hole.
Trim the batting down close to the seam all the way around. Clip the corners off close to the seam to remove any bulk so the corners will pull out nice and crisp when you turn it right side out.

Turn the runner right side out pulling on the corner prairie points so they really square up, work your way around the runner with an iron pressing out the edges so the prairie points lay flat. Fold under, pin and hand stitch the hole closed, and you’re done!

If you do a cute backing, this runner can be reversible!
Ready for the Fourth of July! And now some pie!

Rhubarb Custard Pie
Prep Time: 15 mins
Total Time: 1 hr 15 mins
Serves: 8, Yield: 1 pie
INGREDIENTS
One 9" unbaked pie shell
1¼ cups sugar, divided
¼ teaspoon salt
¼ cup flour
3 Tbsp. orange juice concentrate
2 egg yolks
1 Tbsp butter, melted
3 cups fresh or frozen rhubarb, thawed and drained
3 egg whites
¼ cup chopped walnuts
DIRECTIONS
Preheat the oven to 375 degrees.
Combine 1 cup sugar, and the flour and salt.
Stir in orange juice, yolks and melted butter. Mix well.
Add the rhubarb
In a mixing bowl, beat egg whites until soft peaks form.
Gradually beat in ¼ cup sugar until stiff peaks form.
Fold in the rhubarb mixture. Pour into unbaked pie shell.
Sprinkle with nuts.
Bake at 375 for 15 minutes. Reduce heat to 325; bake 40 to 45 minutes longer or until golden.
Cover loosely with foil for the last ten minutes of baking if crust is browning too quickly.
Cool on a wire rack 1 hour. Store in the refrigerator.


